|
| BlogSoldering... | 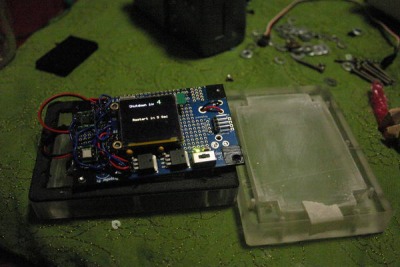 | |
Ughgh... I am such a beginner. Sure, I've owned a $2.99 soldering iron and sort of knew how to use it. I also MIG weld and can solder copper pipe. However, it took a few mistakes before I learned some techniques to solder a circuit board.
First, I bought a new iron, adding a dimmer switch, and welded a little stand. Second, I bought a wire stripped and some cutters and solder.
Then I soldered the circuits down and messed up several times. The screen is stuck down, and it has some lines. I think the ribbon is slipping out or maybe just damaged. I tried desoldering it.
After I also messed up the compass chip, I changed my technique and handled the g-force sensor nicely. I used hotglue to hold it down and then left extra tabs on the bottom. I also learned to place a bunch of wires and solder them in one go from the other side.
I could probably solder one of these boards in 10 minutes now. Oh well. The compass is out of true, and the screen has lines near the top...but I can certainly compensate in software and start planning the next one. I'm tempted to order parts to make another by Thursday.
(Posted 8/18/2008 by admin) |
The Case! | 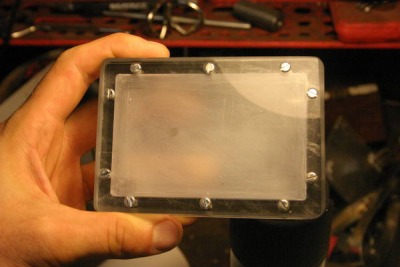 | |
Oh my... I am so excited. I drove out to see Mike (99mpg.com)on Saturday and he literally gave me the whole day (till midnight) helping me build a case for the prototype.
Note, click for photos of the case creation process.
Actually, I should probably say, he let me make some decisions and watch. It was one of those days that expands your horizons. I got to learn about machining, solar, battery charging, soldering techniques, etc. I especially enjoyed learning about the digital micrometer and working with fine precision. Now I want one of those for my birthday.
Anyway, I came home with a nice acrylic case that is split in the middle. It is very close to as small as possible. It still needs 4AA batteries, and will need some further board modifications.
1) We chopped down the board to fit a small case.
2) We removed some components to make it shorter.
3) 4AA batteries puts out 4.2-5.6 volts (rechargable) This should do fine with 2x3.2V solar panels + a .6V drop diode.
4) The 3.3V regulator for the board should work fine since it's drop out is around 0.9V. This means the board will stop working around 4.2V. The screen however requires 4-6V so we might be pushing the parameters a little.
5) We chopped the solar panels with a glass cutter to reduce the width.
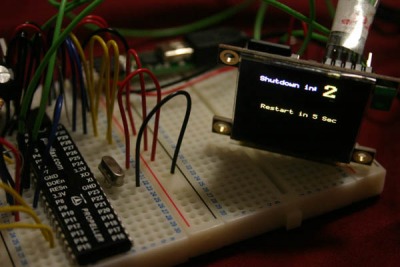
6) The case has no openings and a bunch of screws to close it. I'll turn it on at the start of the event and hopefully sleep functions and solar will allow it to run the whole time.
(Posted 8/18/2008 by admin) |
Storing DataOk, so I learned the screen really needs 4-6V to use the SD card. I moved it's power supply to the primary voltage regulator. Then the demos worked fine.
The next step was really learning how to work with the screen. One annoyance is that you shouldn't pull the power from it. You are expected to run a "power(0)" command. It took me a while to learn to run the opposite to make it display again. Apparently "init()" isn't enough.
Anyway, I got it to display bitmaps and started figuring out how to send data to the device to be stored on the drive. I found some code and started writing a console application. At this point, it can send a string of bits that end up being displayed on the screen. I'll need to write some protocol to reliably send the data...and pad the images and calendar data to fit into sectors nicely.
(Posted 8/15/2008 by admin) |
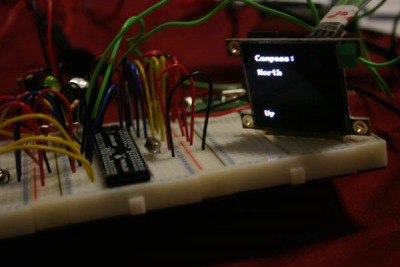
Compass and TiltCool! So the compass and g force sensor are working. I've got them returning good data and happy to report that both run on 3.3V.
I briefly explored running the compass off of a pin so I can shut it off. Luckily, it has a shutdown mechanism that seems to work pretty well.
The screen shows the compass heading and detects a tilt in the four directions. It's actually fun to play with.
(Posted 8/15/2008 by admin) |
Text on the ScreenI'm writing this on Friday night...but I really wanted to give an update on the steps in between. I should warn you that I am sleepy...and making decent progress.
1) Here is a shot of the screen working. It's been great working with the Propeller. So many of the hardware devices already have a driver written. It's like calling in device drivers. The language, spin, works object oriented so I add objects and it runs.
On the other hand, I still have a long way to get a platform up and running that I can focus on code. I'm still "exploring."
(Posted 8/15/2008 by admin) |
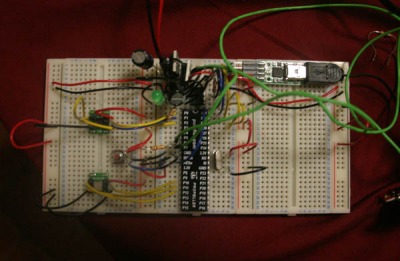
Got Power?I made great progress last night. I have the breadboard assembled and most of the components working. Well, working enough to get some power readings.
This Propeller board is nice because there are drivers for everything I want to use. I just merge lots of code and it seems to just flow together.
1) The base board takes - 39mA.
2) Displaying lots of pixels on the screen - 150mA.
3) Base board + everything (no screen) - 65mA
4) Everything (just text on screen) - 90mA
The board starts with 5V and a 3.3V regulators. I only need 3.3V, so I pulled the 5V and lowered the energy requirement 10-15mA.
This really calls into question my 9V battery pack. That's almost 2x the voltage (and weight) that I need. The 3.3V regulator needs 4.75-26V.
I may also be able to wire the board so I can shut down components and add a sleep mode.
(Posted 8/13/2008 by admin) |
The Case - removing compontents to reduce height...Ok, this is similar to the last entry... I'm just looking at the side. My thought is to remove the power socket, chop a little off the on/off switch, and remove the capacitor that is near the motor connectors.
(Posted 8/11/2008 by admin) |
The case...chopping the board down?So I don't have the board even running yet... But I wonder if I can chop down the prototype board. This diagram shows how none of the "critical" components sits outside of the big yellow box. In theory, I could run two cuts and have the board sit right in the same footprint as the battery pack.
Actually, there is a recessed area on the battery pack. In theory, I could go on step further and chop it down to fit within that lip. It might make the device a whole 1/4" thinner.
(Posted 8/11/2008 by admin) |
The Parts Arrived...BreadboardSo... The parts arrived and I quickly realized that I have a long way to go to get a running board. I assembled the basic education kit.
Hopefully, it won't take too long to get some programs running...and the screen, and compass, and tilt sensor running. Oh yeah, I also added a little speaker so it can play sounds. Maybe that will need to come later.
Once I can get a basic kit running, then I want to switch to the soldered prototype board so it can be a little tougher.
(Posted 8/11/2008 by admin) |
I Downloaded the CalendarI used a VB6 app to download the pages and pull out the relevant information. This is very common on the internet (probably 2/3 of the traffic online is a bot). Though I would not call it entirely ethical.
The information is available for free. However, it puts a load on the web server. Please be gentle if you write apps like this. Download pages at off hours and space out the page loads to not impact their bandwidth and other visitors.
I'm not going to release the source code unless you give me a strong reason. It was easy to write: 3-4 hours.
Anyone else can go directly to the Burning Man website to get it themselves. Hopefully in the future, we'll have better access to a database we can use. For example, this one only has camp names. It would sure be nice to get locations.
(Posted 8/7/2008 by admin) |
I Ordered the Parts...So far I've got a battery pack and a list of parts on the way from Parallax. I decided to start with a DIP Propeller kit. I'm a little nervous to solder right onto the prototype board. The kit includes a breadboard. It may also allow me to buy a case that comes with a circuit board for a nice polished look.
Anyway, this is a pretty big purchase for me. But last year I learned so much from the $80, I figure it's another leap of faith.
The man burns in 23 days. I've never written a line of Spin (the language for the Propeller) and I'm not sure how hard it will be to assemble the circuits.
Something will come together. | 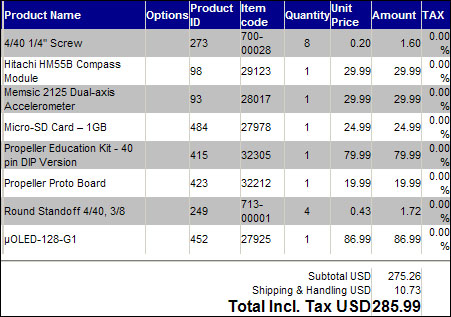 | | | Here is the parts I ordered... |
(Posted 8/7/2008 by admin) |
|
| |